This is an old revision of the document!
Mesh Central in Docker behind NGINX Proxy Manager Reverse Proxy
- What is Nginx Proxy Manager (also known as NPM): https://nginxproxymanager.com/
- What is Mesh Central: https://meshcentral.com/info/
Deploying container
- We will be using an unofficial, but as of writing this article still maintained and community approved, Docker version of Mesh Central
- I will be using Portainer in this guide, but you can use manual Docker Compose if you wish
- Here is an example of my docker-compose.yml file
version: '3'

networks:
  reverse_proxy:
    external: true
volumes:
  data:
  files:

services:
    mongodb:
        container_name: meshcentral_db
        restart: always
        image: mongo:latest
        expose:
            - 27017
        volumes:
            - '/docker/containers/meshcentral/database:/data/db'
        networks:
          - reverse_proxy

    meshcentral:
        restart: always
        container_name: meshcentral
        depends_on:
            - 'mongodb'
        image: typhonragewind/meshcentral:mongodb-latest
        ports:
            - 8786:443 #MeshCentral will moan and try everything not to use port 80, but you can also use it if you so desire, just change the config.json according to your needs
        environment:
            - HOSTNAME=meshcentral.laptopwiki.eu     #your hostname
            - REVERSE_PROXY=nginx-proxy-manager     #set to your reverse proxy IP if you want to put meshcentral behind a reverse proxy
            - REVERSE_PROXY_TLS_PORT=443 #internal https port, only change if you don't use 443 for your incoming HTTPS for some reason
            - IFRAME=false #set to true if you wish to enable iframe support
            - ALLOW_NEW_ACCOUNTS=false    #set to false if you want disable self-service creation of new accounts besides the first (admin)
            - WEBRTC=false  #set to true to enable WebRTC - per documentation it is not offically released with meshcentral, but is solid enough to work with. Use with caution
            - NODE_ENV=production
            - TZ=Europe/Prague
        volumes:
            - data:/opt/meshcentral/meshcentral-data
            - files:/opt/meshcentral/meshcentral-files
        networks:
          - reverse_proxy
- In this, Mesh Central will use a MongoDB instance to store everything, instead of SQLite
- You must change:
- Network name to match what your NPM is using, in my case that name is “reverse_proxy”
- HOSTNAME - set your public FQDN
- REVERSE_PROXY - here put
- IP address of your NGINX Proxy Manager if it is on a different server than where Mesh Central will live
- internal docker Hostname if on the same Docker network ← My setup, “nginx-proxy-manager” is the Docker hostname. DO NOT USE DOCKER NETWORK IP ADDRESSES, they aren't static
- You can change
- TZ - timezone, so your logs have proper timestamps, follows standardized naming https://en.wikipedia.org/wiki/List_of_tz_database_time_zones
- For example, TZ=Europe/Prague, TZ=America/New_York, TZ=Australia/Sydney
- Storage mounts (I had issues with MeshCentral Volume paths, so that is why I'm using volumes)
- ALLOW_NEW_ACCOUNTS=false, setting true would allow users to register
With FALSE on first start you can create an account, that will be your admin, after that registrations get disabled
Config File
- You will find the config file in the container's /opt/meshcentral/meshcentral-data folder
- Since I used a Docker Volume, I can use Portainer to see where that is mounted on my server's filesystem
For example: /var/lib/docker/volumes/meshcentral_data/_data
- Open the config.json file with
sudo nano /var/lib/docker/volumes/meshcentral_data/_data/config.json
- If this is your initial installation, the config file will be pretty barebones
- Modify it according to this example, changing stuff like your FQDN
{
  "$schema": "http://info.meshcentral.com/downloads/meshcentral-config-schema.json",
  "settings": {
    "cert": "meshcentral.laptopwiki.eu",
    "_WANonly": true,
    "_LANonly": true,
    "_sessionKey": "generate_password_here",
    "port": 443,
    "_aliasPort": 443,
    "redirPort": 80,
    "_redirAliasPort": 80,
    "AgentPong": 300,
    "TLSOffload": "nginx-proxy-manager",
    "_ignoreAgentHashCheck": false,
    "SelfUpdate": false,
    "AllowFraming": "false",
    "mongodb": "mongodb://mongodb:27017/mesh",
    "mongodbcol": "mesh",
    "WebRTC": "false"
  },
  "domains": {
        "": {
          "_title": "Mesh Central",
          "_title2": "Mesh Central",
          "_minify": true,
          "NewAccounts": "false",
          "_userNameIsEmail": true,
          "certUrl": "https://meshcentral.laptopwiki.eu:443"
        }
  },
  "_letsencrypt": {
    "__comment__": "Requires NodeJS 8.x or better, Go to https://letsdebug.net/ first before>",
    "_email": "[email protected]",
    "_names": "myserver.mydomain.com",
        "production": false
  }
}
So what are we changing and why?
- TLDR:
- Mesh Central uses a self signed certificate to talk to clients.
- Since ours is behind NPM it can't communicate directly and hashes won't match.
- We need to tell it to instead use NPM's certificate
- “cert”: “meshcentral.laptopwiki.eu” - to tell Mesh Central what certificate to use
- “_sessionKey”: “generate_password_here”, - please use a password manager to generate a random password here
- “TLSOffload”: “nginx-proxy-manager” - set Docker hostname or IP address of your NPM installation, don't put port here
- “port”: 443, - change if you don't use 443. If your NPM isn't on the same docker host this should be the exposed port (for example 8786) but I haven't tested it so I don't really know.
- “certUrl”: “https://meshcentral.laptopwiki.eu:443” - Public FQDN of your Mesh Central server, including the port
- Save the file (Press Ctrl+O and Enter to save changes and Ctrl+X to exit Nano)
- Restart the container
NGINX Proxy Manager
- Add a new Proxy host as you would with any other Docker container
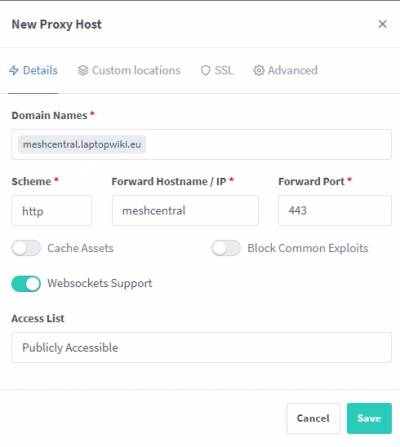
- Don't forget to check Websockets Support
- In SSL select your certificate, force SSL and enable HTTP/2
- In the Advanced tab paste the following

proxy_set_header CF-Connecting-IP $proxy_add_x_forwarded_for;
proxy_set_header X-Forwarded-Host $host:$server_port;
proxy_set_header X-Forwarded-For $proxy_add_x_forwarded_for;
proxy_set_header X-Forwarded-Proto $scheme;
If Cloudflare Proxy
- This setup works fine through Cloudflare Proxy, assuming
- Cloudflare Dashboard → yourdomain.tld → SSL/TLS → Overview → FULL
- This is necessary so that the Cloudflare Proxy and your local certificate match and Cloudflare doesn't try to redirect